Email signatures are the shoes of the business world. Sometimes you just need a short, to-the-point one for chain replies. Sometimes you need a formal, official-looking one. Unfortunately, Microsoft Outlook’s signature options can be somewhat difficult to find, buried deep in the abyss of its backstage mode for robust options.
Here’s how to create a signature in Outlook 2013 in five quick steps.
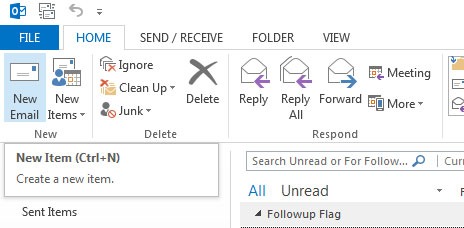
1. Click New Email at the top left corner of the Home tab.
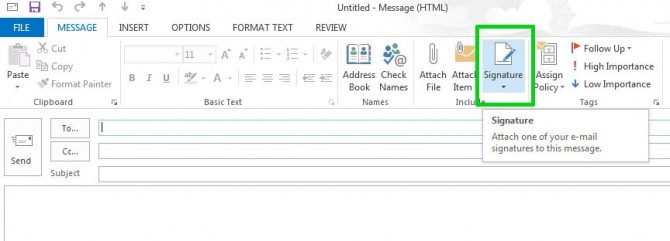
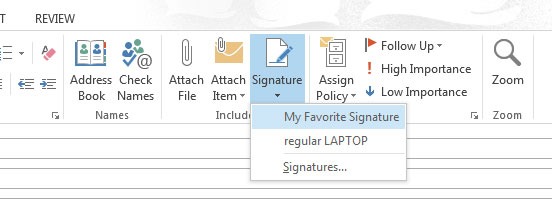
2. Click Signature from the top panel, next to Attach Item. A dropdown menu will appear, with options to add an existing signature to the email you’re working on. Select Signatures from this menu to open a Signatures and Stationery window.
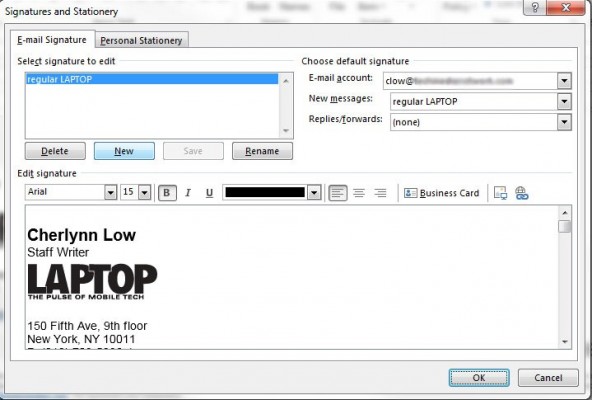
3. Click New in the Signatures and Stationery window to create a new signature template.
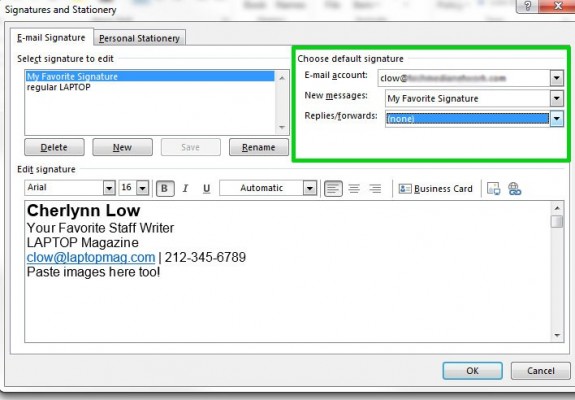
4. Compose your signature in the editing window. If you have your contact information already saved in Outlook, you can simply import all that information as a business card by clicking Business Card at the top right of the edit options.
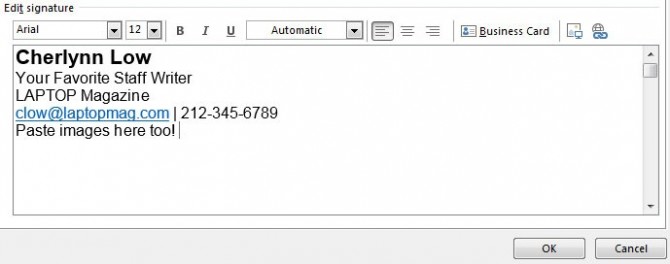
You can add images to your signature, like a logo or banner, by pasting them into the editor or clicking the button to the right of the Business Card button. URLs will be automatically hyperlinked, but if you want to add your own link, you can click the Insert Hyperlink button on the extreme right. Click OK, and your signature will be saved for future use.
5. Designate your new signature as your default in the Signatures and Stationery window if you want to make sure it is included with every new message and replies or forwards you send.
If you don’t want a default signature , you can insert the signature into individual email messages by clicking Signature in the Compose window as in Step 1, and selecting the signature you just created.
Hope that you’ve enjoyed this quick tip!
Email signatures are the shoes of the business world. Sometimes you just need a short, to-the-point one for chain replies. Sometimes you need a formal, official-looking one. Unfortunately, Microsoft Outlook’s signature options can be somewhat difficult to find, buried deep in the abyss of its backstage mode for robust options.
Here’s how to create a signature in Outlook 2013 in five quick steps.
1. Click New Email at the top left corner of the Home tab.

2. Click Signature from the top panel, next to Attach Item. A dropdown menu will appear, with options to add an existing signature to the email you’re working on. Select Signatures from this menu to open a Signatures and Stationery window.

3. Click New in the Signatures and Stationery window to create a new signature template.

4. Compose your signature in the editing window. If you have your contact information already saved in Outlook, you can simply import all that information as a business card by clicking Business Card at the top right of the edit options.

You can add images to your signature, like a logo or banner, by pasting them into the editor or clicking the button to the right of the Business Card button. URLs will be automatically hyperlinked, but if you want to add your own link, you can click the Insert Hyperlink button on the extreme right. Click OK, and your signature will be saved for future use.
5. Designate your new signature as your default in the Signatures and Stationery window if you want to make sure it is included with every new message and replies or forwards you send.

If you don’t want a default signature , you can insert the signature into individual email messages by clicking Signature in the Compose window as in Step 1, and selecting the signature you just created.

Hope that you’ve enjoyed this quick tip!
Published on June 30, 2015

